How to Automate Invoices with n8n and Google Sheets

If you send the same kind of invoice every month, you probably copy a template, change five fields, export a PDF and attach it to an email. That is ten minutes of careful, boring work per client, and one typo can delay a payment.
This guide shows how to automate invoices with n8n and Google Sheets. The workflow reads the rows marked Ready in a sheet, fills a Google Docs template, turns it into a PDF, emails it to the client and marks the row as Sent. If n8n is new to you, read our n8n for beginners guide first.

This post may contain affiliate links. If you buy through them, we may earn a commission at no extra cost to you.
What you need before you start
An n8n account: n8n Cloud or a self-hosted install. The free self-hosted Community Edition is enough for this workflow.
A Google account with Sheets, Docs, Drive and Gmail. Use the account you already send invoices from.
Google credentials in n8n: n8n walks you through the Google sign-in when you add the first Google node.
About 45 minutes for the first setup and test.
Not sure n8n is the right tool for you? Our n8n vs Zapier vs Make comparison explains where each one fits.
Step 1: Set up the invoice sheet
Create a Google Sheet called "Invoices" with one row per invoice and these six columns:

invoice_no: a unique ID, such as INV-2026-001. The workflow uses it to find the row again.
client_name: the name exactly as it should appear on the invoice.
client_email: where the PDF invoice is sent.
amount: the total due, with the currency.
due_date: the payment deadline.
status: Ready, Sent or Paid.
Keep one simple rule: the workflow only touches rows where status is Ready. You stay in control of what gets sent by changing a single cell.
Step 2: Create the invoice template in Google Docs
Design the invoice in Google Docs the way you want clients to see it: your business name, logo, payment details and any text your local rules require. Then put placeholders where the variable data goes, written in double curly braces with the same names as your columns:
{{invoice_no}} {{client_name}} {{amount}} {{due_date}}
Save the document in a Drive folder such as "Invoice templates" and copy its file ID from the address bar: it is the long code between /d/ and /edit.
Step 3: Build the workflow in n8n
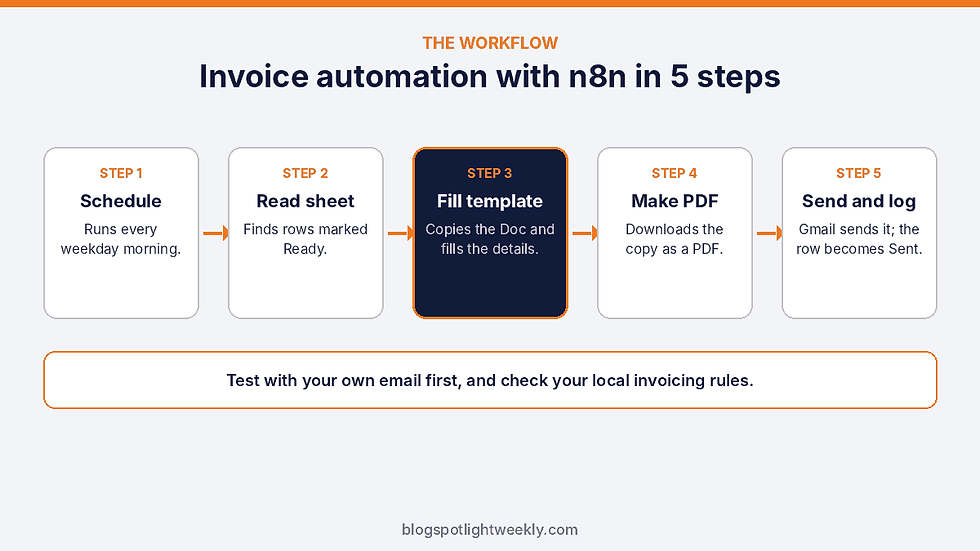
The image groups the workflow into five stages. In n8n they become seven nodes, added in this order. Node names below follow the current n8n editor; labels can shift a little between versions.
1. Schedule Trigger
Set it to run every weekday morning, for example at 8:00. While you build, use the manual "Execute workflow" button instead, so nothing runs on its own.
2. Google Sheets: Get row(s)
Point it at the "Invoices" sheet and add a filter so it returns only rows where status is Ready. Each matching row becomes one item, and n8n runs the next nodes once for each item.
3. Google Drive: Copy file
Copy the template using its file ID and name the copy with an expression such as {{ $json.invoice_no }} - {{ $json.client_name }}. Every invoice gets its own document and the template stays clean.
4. Google Docs: Update a document
Open the new copy using the ID returned by the Copy file node, and add one "Find and replace text" action per placeholder. Because the previous node now outputs the Drive file, pull the sheet values by node name, for example {{ $('Get row(s)').item.json.amount }}. Use the name your Sheets node actually has.
5. Google Drive: Download file
Download the filled document and, in the Google file conversion options, choose PDF for Google Docs. The node now holds the invoice as a PDF file.
6. Gmail: Send a message
Send it to the client_email from the sheet, with a clear subject such as "Invoice INV-2026-001" and a short message with the amount and due date. In the options, add the PDF as an attachment; the file is usually stored in the binary property called "data".
7. Google Sheets: Update row
Match the row by invoice_no and set status to Sent. This step is what stops the same invoice from being emailed again on the next run.
Step 4: Test safely before going live
Create a test row with your own email in client_email and run the workflow manually.
Open the PDF and check that every placeholder was replaced and that amounts and dates look right.
Confirm the row changed to Sent, then run the workflow again. Nothing should be sent the second time.
Only then activate (publish) the workflow so the schedule takes over.
Common problems and how to fix them
A placeholder stays in the PDF: the text in the document does not exactly match the text you search for. Retype the placeholder in Docs in one go; formatting changes in the middle of it can break the match.
Dates or numbers look wrong: Google Sheets can send a formatted value or a raw number. Check the value output options in the Sheets node, or format the value with an n8n expression.
The same invoice was sent twice: the Update row step failed or matched the wrong column. Make sure every invoice_no is unique.
Google permission errors: reconnect the Google credential and check that the account can open both the sheet and the template.
Emails land in spam: keep the message short, send from your usual business address and avoid sending large batches at once.
Before you rely on it
An automation sends exactly what the sheet says, so mistakes travel fast. Keep a human check in the loop: you decide when a row becomes Ready. Invoice requirements such as numbering, tax IDs and mandatory fields differ by country, so confirm what applies to your business with your accountant. This guide covers the workflow, not tax or legal advice.
Once it runs smoothly, a natural next step is a reminder workflow: a second schedule that looks for rows still marked Sent after the due date and emails a polite payment reminder. For more ideas on where AI and automation help a small team, see our guide to the best AI tools for small business.
The bottom line
With one Google Sheet, one Docs template and a seven-node n8n workflow, invoicing becomes "fill in a row, mark it Ready". Build it once, test it on yourself, and let the schedule handle the repetitive part while you keep the final say.
Get one ready-to-use automation every week: subscribe to the Blog Spotlight Weekly newsletter.


Comments